
Getting Started - Create and Manage Users
TABLE OF CONTENTS
Still have questions? Contact [email protected]
What are User Roles and Permissions?
Sub-account user roles and permissions determine what features a user can access within a specific location in MyAura. Whether you're giving a sales rep limited visibility or assigning full admin access to a team lead, user roles ensure the right people see and control the right parts of your account. Each user is assigned one of two roles, Admin or User, and can be further customized using granular permissions and visibility toggles like Only Assigned Data. You can also copy permissions from one user to another and restrict visibility on a per-module basis.
Key Benefits of Sub-account Roles & Permissions
Role management isn’t just housekeeping—it drives operational security and efficiency:
Data Security: Restrict contacts, pipelines, and campaigns to approved staff only.
Cleaner Interface: Hide unused menus so team members navigate faster.
Accountability: Attribute every action to a specific user for airtight audit trails.
Faster Onboarding: Clone proven role templates instead of rebuilding settings from scratch.
How to Set Up Sub-Account Roles & Permissions
Configuring roles and permissions ensures that each team member sees and controls only what they need to. Follow these steps to get started.
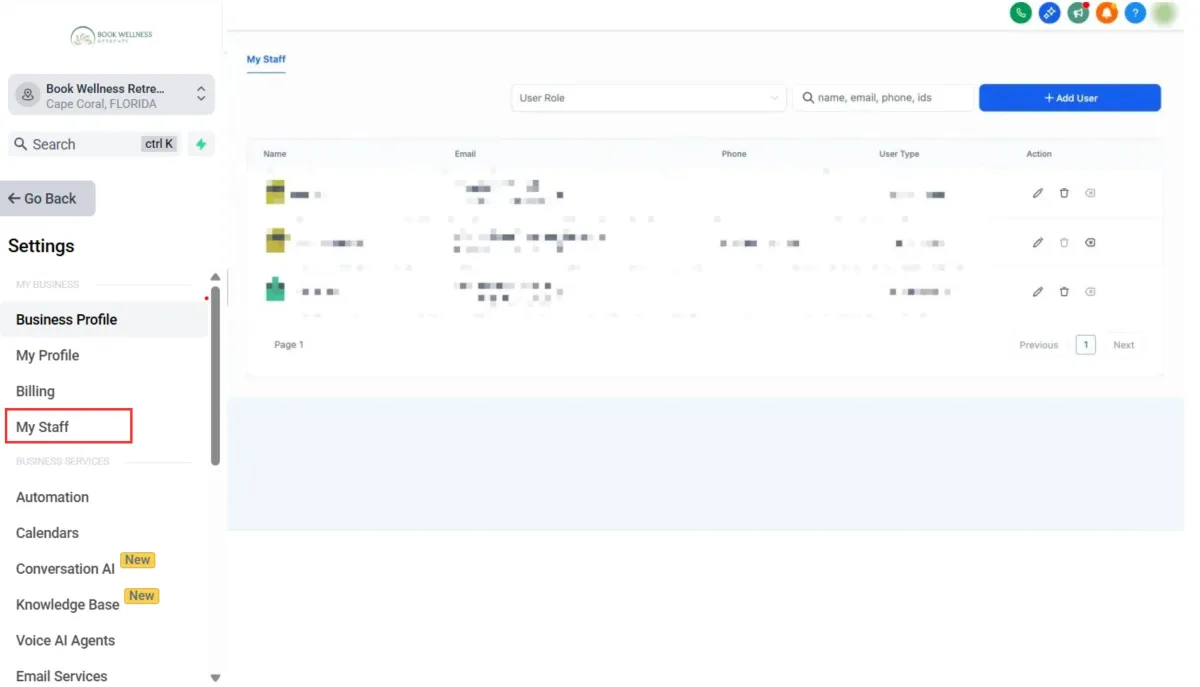
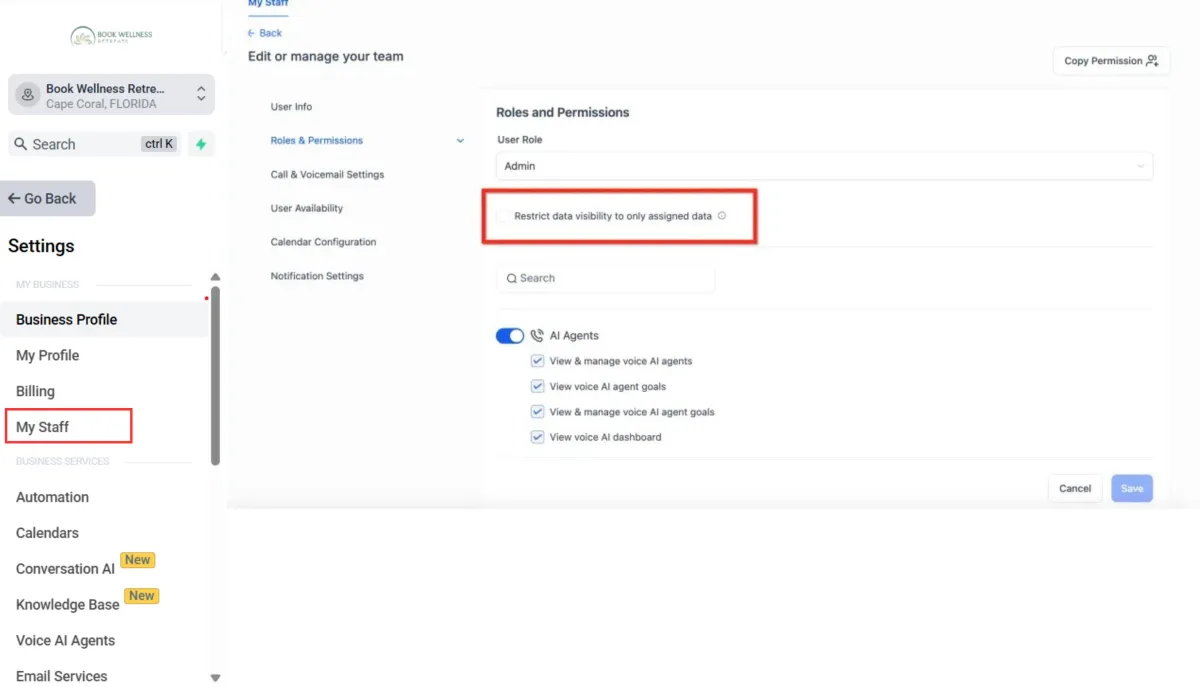
Step 1: Go to Settings › My Staff
Navigate to the sub-account you want to manage. Under Settings, click My Staff.
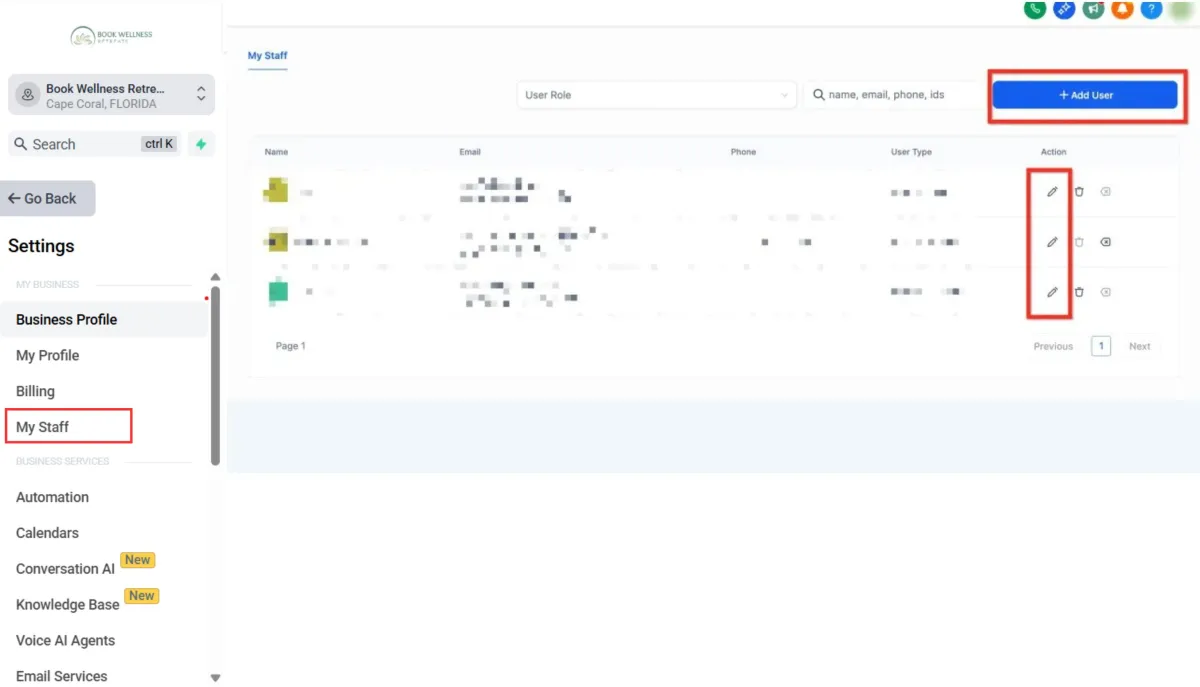
Step 2: Choose a User or Create a New One
Click the Edit (pencil) icon next to an existing user or select + Add Employee to create a new profile.
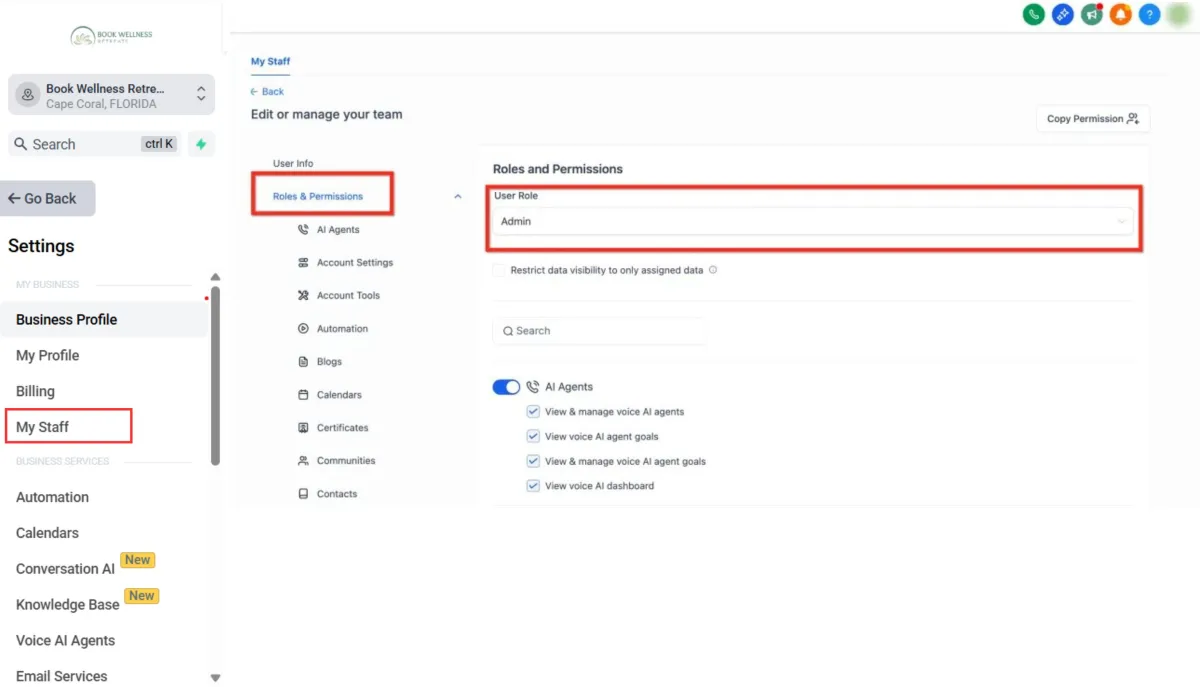
Step 3: Assign a Role: Admin or User
Click Roles and Permissions tab on the left. Then in the Role dropdown, choose:
Admin: full access to all modules and settings in the sub-account
User: restricted access; granular permissions apply
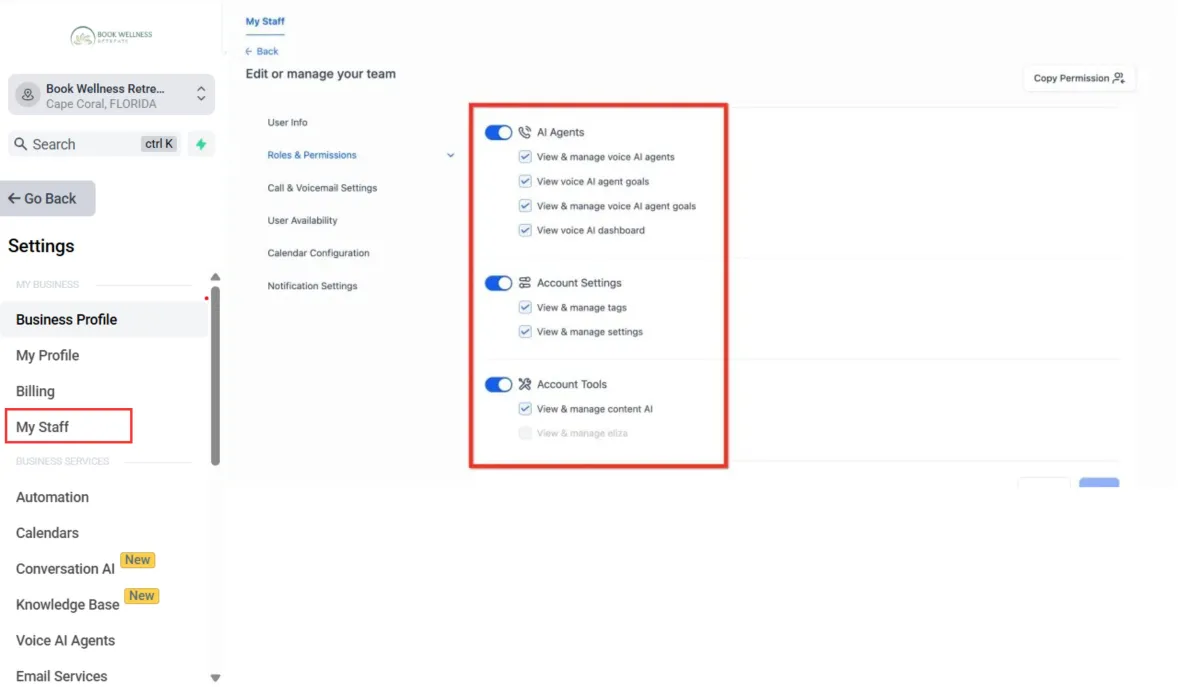
Step 4: Enable/Disable Modules as Needed
Use the checkboxes to grant or restrict access to modules like Conversations, Workflows, Calendars, Voice AI, etc.
Step 5: Set 'Only Assigned Data' if Needed
Toggle Only Assigned Data to restrict a user’s visibility to only the leads, opportunities, and data explicitly assigned to them.
Step 6: Save Your Changes
Click Update or Save to apply the new permission configuration.
Restrict Visibility with “Only Assigned Data”
Limiting access based on assigned data helps protect sensitive information while empowering users to focus only on their own work. When you turn Only Assigned Data ON, the user will only see:
Contacts assigned to them
Opportunities where they’re the owner
Appointments or tasks linked to their name
Example Use-Case: Use this feature for sales reps to ensure they only see and manage their own pipeline without accessing others’ conversations or clients.
Assigning Roles & Permissions
User roles define high-level access, while permissions define which modules they can use. We recommend granting Admin access only to team leads, trusted employees, or internal managers.
Admin: Full control over all tools, settings, and data inside the sub-account
User: Limited access based on permissions; can be restricted to assigned data only
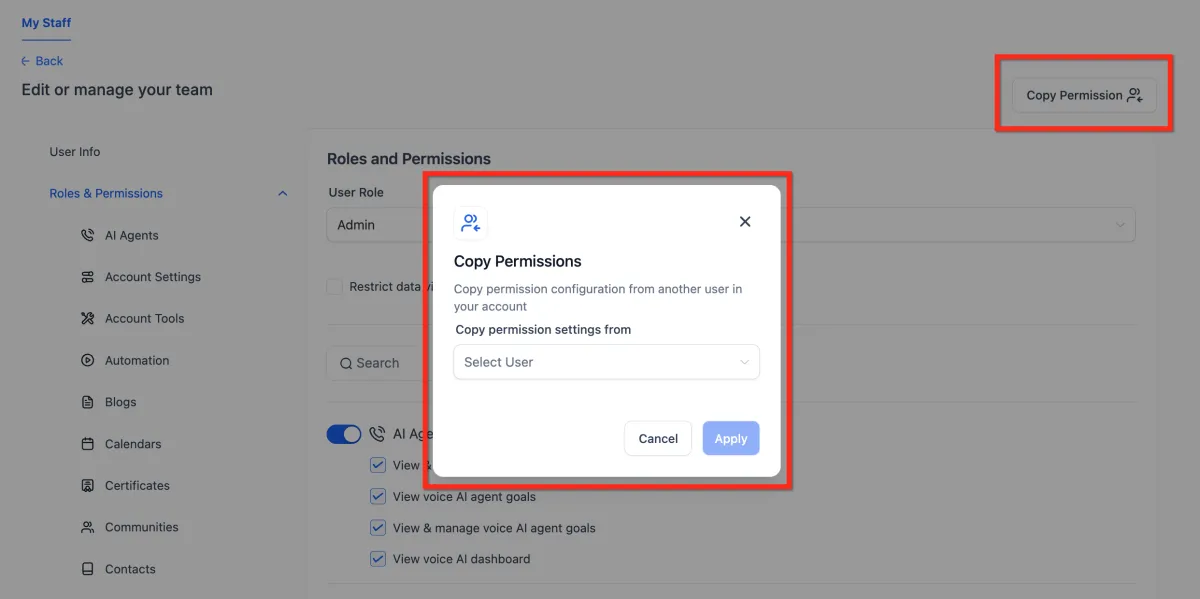
Copy Permissions Between Users
To save time when onboarding new users, you can clone an existing permission set.
Go to Settings › My Staff
Click the Edit (pencil) icon next to an existing user or select + Add Employee to create a new profile.
Select the Roles and Permissions tab
Click Copy Permissions button in the top right
Use the Copy Permissions dropdown to choose a source user
Click Copy to apply those exact settings
Module-Specific Granular Permissions
MyAura now offers detailed control over access to individual modules and their sub-features. Granular permissions allow you to give users precise access to specific tools and features inside a sub-account. This is ideal for managing large teams, limiting sensitive actions, and reducing the risk of accidental changes.
Granular Permissions are available for the following areas:
AI Agents
Account Settings
Account Tools
Automation (includes Workflows)
Blogs
Calendars
Certificates
Communities
Contacts
Conversations
Forms
Funnels
Gokollab
Integrations
Marketing
Medias
Memberships
Opportunities
Payments
QR Codes
Quizzes
Dashboard
Reputations
Surveys
User Management
WordPress
Frequently Asked Questions
Q: What happens if I disable a module for a user but it’s used in a workflow?
The user won’t see or interact with the module, but workflows will still run. Make sure someone else retains full access to manage those automations.
Q: Can I assign different permissions for each calendar?
Yes, calendar permissions are now granular. You can allow booking access to specific calendars or give full management rights.
Q: Can I bulk assign permissions across users?
Not. You can use the Copy Permissions feature one-by-one, or request bulk provisioning through our roadmap.
Q: What’s the difference between Admin at the agency level and Admin at the sub-account level?
Agency Admins control all sub-accounts, SaaS products, and billing. Sub-account Admins only control a specific location.
Q: Can a user manage multiple locations without being an agency admin?
Yes. You can use Account Admins to manage several sub-accounts without giving them full agency access.
Getting Started - Create and Manage Users
TABLE OF CONTENTS
Still have questions? Contact [email protected]
What are User Roles and Permissions?
Sub-account user roles and permissions determine what features a user can access within a specific location in MyAura. Whether you're giving a sales rep limited visibility or assigning full admin access to a team lead, user roles ensure the right people see and control the right parts of your account. Each user is assigned one of two roles, Admin or User, and can be further customized using granular permissions and visibility toggles like Only Assigned Data. You can also copy permissions from one user to another and restrict visibility on a per-module basis.
Key Benefits of Sub-account Roles & Permissions
Role management isn’t just housekeeping—it drives operational security and efficiency:
Data Security: Restrict contacts, pipelines, and campaigns to approved staff only.
Cleaner Interface: Hide unused menus so team members navigate faster.
Accountability: Attribute every action to a specific user for airtight audit trails.
Faster Onboarding: Clone proven role templates instead of rebuilding settings from scratch.
How to Set Up Sub-Account Roles & Permissions
Configuring roles and permissions ensures that each team member sees and controls only what they need to. Follow these steps to get started.
Step 1: Go to Settings › My Staff
Navigate to the sub-account you want to manage. Under Settings, click My Staff.
Step 2: Choose a User or Create a New One
Click the Edit (pencil) icon next to an existing user or select + Add Employee to create a new profile.
Step 3: Assign a Role: Admin or User
Click Roles and Permissions tab on the left. Then in the Role dropdown, choose:
Admin: full access to all modules and settings in the sub-account
User: restricted access; granular permissions apply
Step 4: Enable/Disable Modules as Needed
Use the checkboxes to grant or restrict access to modules like Conversations, Workflows, Calendars, Voice AI, etc.
Step 5: Set 'Only Assigned Data' if Needed
Toggle Only Assigned Data to restrict a user’s visibility to only the leads, opportunities, and data explicitly assigned to them.
Step 6: Save Your Changes
Click Update or Save to apply the new permission configuration.
Restrict Visibility with “Only Assigned Data”
Limiting access based on assigned data helps protect sensitive information while empowering users to focus only on their own work. When you turn Only Assigned Data ON, the user will only see:
Contacts assigned to them
Opportunities where they’re the owner
Appointments or tasks linked to their name
Example Use-Case: Use this feature for sales reps to ensure they only see and manage their own pipeline without accessing others’ conversations or clients.
Assigning Roles & Permissions
User roles define high-level access, while permissions define which modules they can use. We recommend granting Admin access only to team leads, trusted employees, or internal managers.
Admin: Full control over all tools, settings, and data inside the sub-account
User: Limited access based on permissions; can be restricted to assigned data only
Copy Permissions Between Users
To save time when onboarding new users, you can clone an existing permission set.
Go to Settings › My Staff
Click the Edit (pencil) icon next to an existing user or select + Add Employee to create a new profile.
Select the Roles and Permissions tab
Click Copy Permissions button in the top right
Use the Copy Permissions dropdown to choose a source user
Click Copy to apply those exact settings
Module-Specific Granular Permissions
MyAura now offers detailed control over access to individual modules and their sub-features. Granular permissions allow you to give users precise access to specific tools and features inside a sub-account. This is ideal for managing large teams, limiting sensitive actions, and reducing the risk of accidental changes.
Granular Permissions are available for the following areas:
AI Agents
Account Settings
Account Tools
Automation (includes Workflows)
Blogs
Calendars
Certificates
Communities
Contacts
Conversations
Forms
Funnels
Gokollab
Integrations
Marketing
Medias
Memberships
Opportunities
Payments
QR Codes
Quizzes
Dashboard
Reputations
Surveys
User Management
WordPress
Frequently Asked Questions
Q: What happens if I disable a module for a user but it’s used in a workflow?
The user won’t see or interact with the module, but workflows will still run. Make sure someone else retains full access to manage those automations.
Q: Can I assign different permissions for each calendar?
Yes, calendar permissions are now granular. You can allow booking access to specific calendars or give full management rights.
Q: Can I bulk assign permissions across users?
Not. You can use the Copy Permissions feature one-by-one, or request bulk provisioning through our roadmap.
Q: What’s the difference between Admin at the agency level and Admin at the sub-account level?
Agency Admins control all sub-accounts, SaaS products, and billing. Sub-account Admins only control a specific location.
Q: Can a user manage multiple locations without being an agency admin?
Yes. You can use Account Admins to manage several sub-accounts without giving them full agency access.
Ready to Transform Your Wellness Business?
Join hundreds of wellness leaders who are nurturing their retreat businesses with our gentle yet powerful platform

The complete platform for wellness entrepreneurs to design, grow, and run their business with purpose.
Platform
Marketing Services
Support
Copyright © 2025. Book Wellness Retreats LLC, All rights reserved
Ready to Transform Your Wellness Business?
Join hundreds of wellness leaders who are nurturing their retreat businesses with our gentle yet powerful platform
The complete platform for wellness entrepreneurs to design, grow, and run their business with purpose.
Platform
Marketing Services
Support
Copyright © 2025. Book Wellness Retreats LLC, All rights reserved