
Getting Started - Setup Your Domain
TABLE OF CONTENTS
Still have questions? Contact [email protected]
What You’ll Need Before You Start
Before setting up your domain, make sure you have the following in place:
Access to your DNS provider’s control panel (Cloudflare, GoDaddy, AWS Route 53, Namecheap, Google Domains, etc.).
The domain or subdomain you want to use for sending emails.
Credentials or permissions to add/edit DNS records.
A basic understanding of DNS record types (SPF, DKIM, DMARC, CNAME, TXT, MX).
Step 1: Add Your Domain
Adding your domain is the first step toward authentication.
Access Dedicated Domains
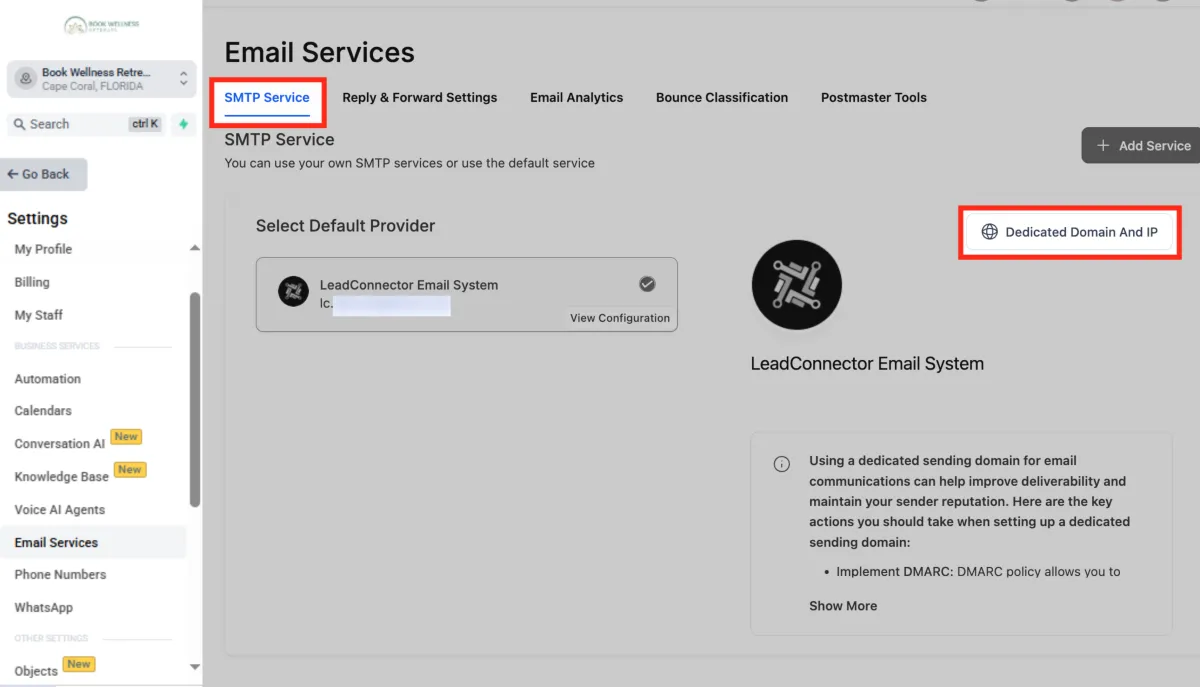
Navigate to Settings > Email Services > Dedicated Domain & IP.
Add Domain
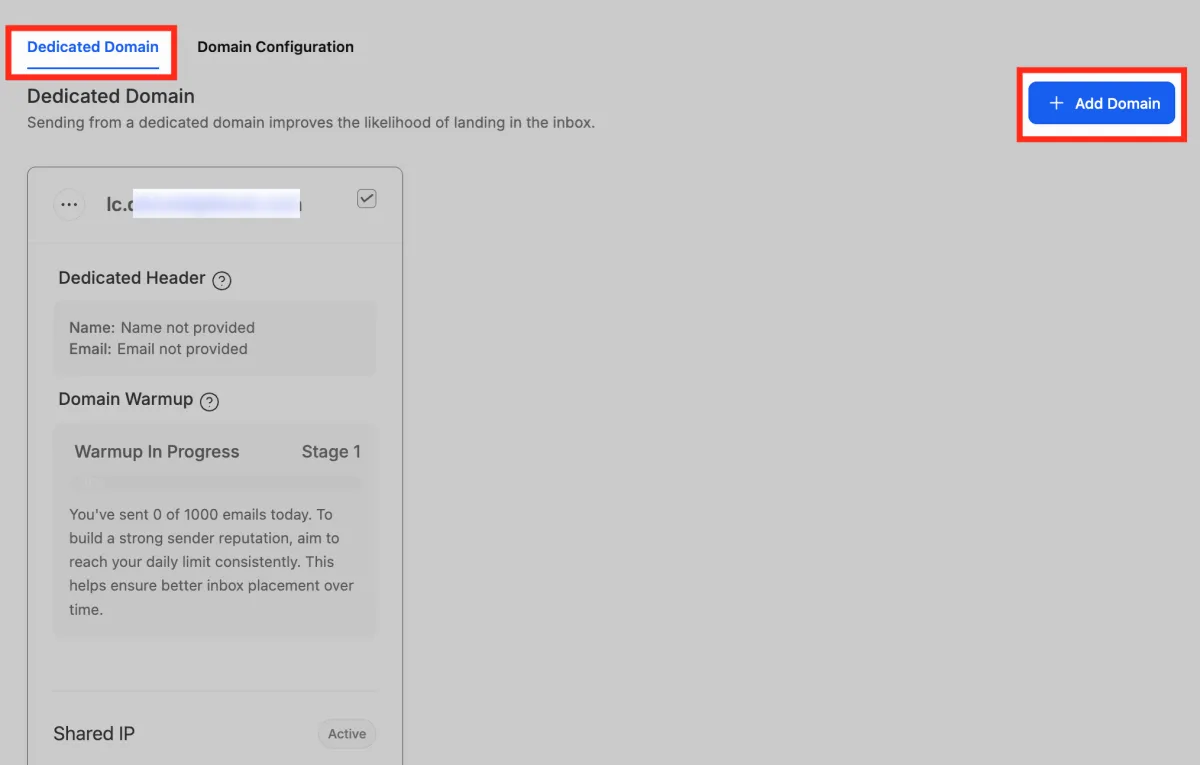
Once you are inside, "Dedicated Domains" menu, Click + Add Domain option at the top right corner.
Add Domain Details
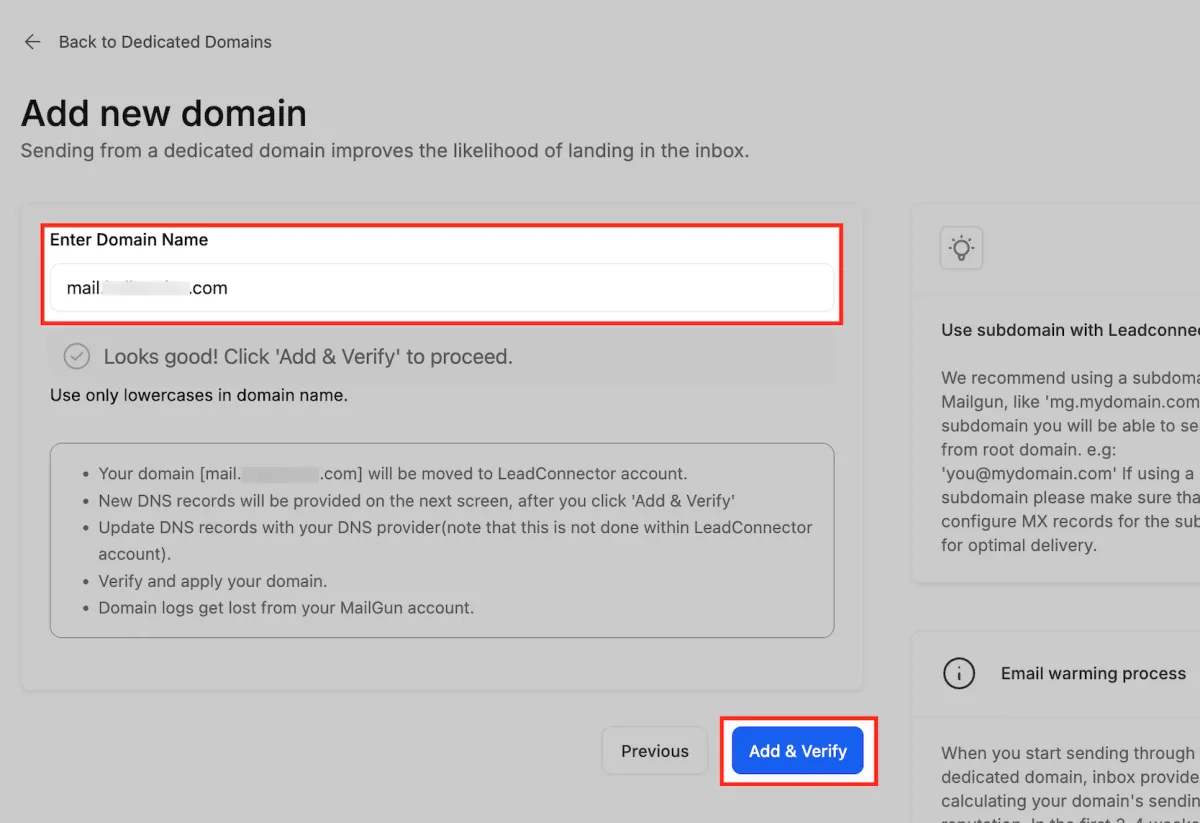
Enter the domain or subdomain you want to use. (We recommend using a subdomain, such as mail.yourdomain.com, for better deliverability.) Click Add & Verify.
Step 2: Verify Your Domain
Verification ensures your emails are authenticated and trusted by inbox providers. This involves setting up DNS records for your domain.
What DNS Record Types Are Needed & Why
SPF (Sender Policy Framework): Authorizes which servers can send emails on behalf of your domain.
DKIM (DomainKeys Identified Mail): Adds a digital signature to your emails to prove they haven’t been altered.
DMARC (Domain-based Message Authentication, Reporting & Conformance): Enforces authentication policies and provides reporting on email delivery.
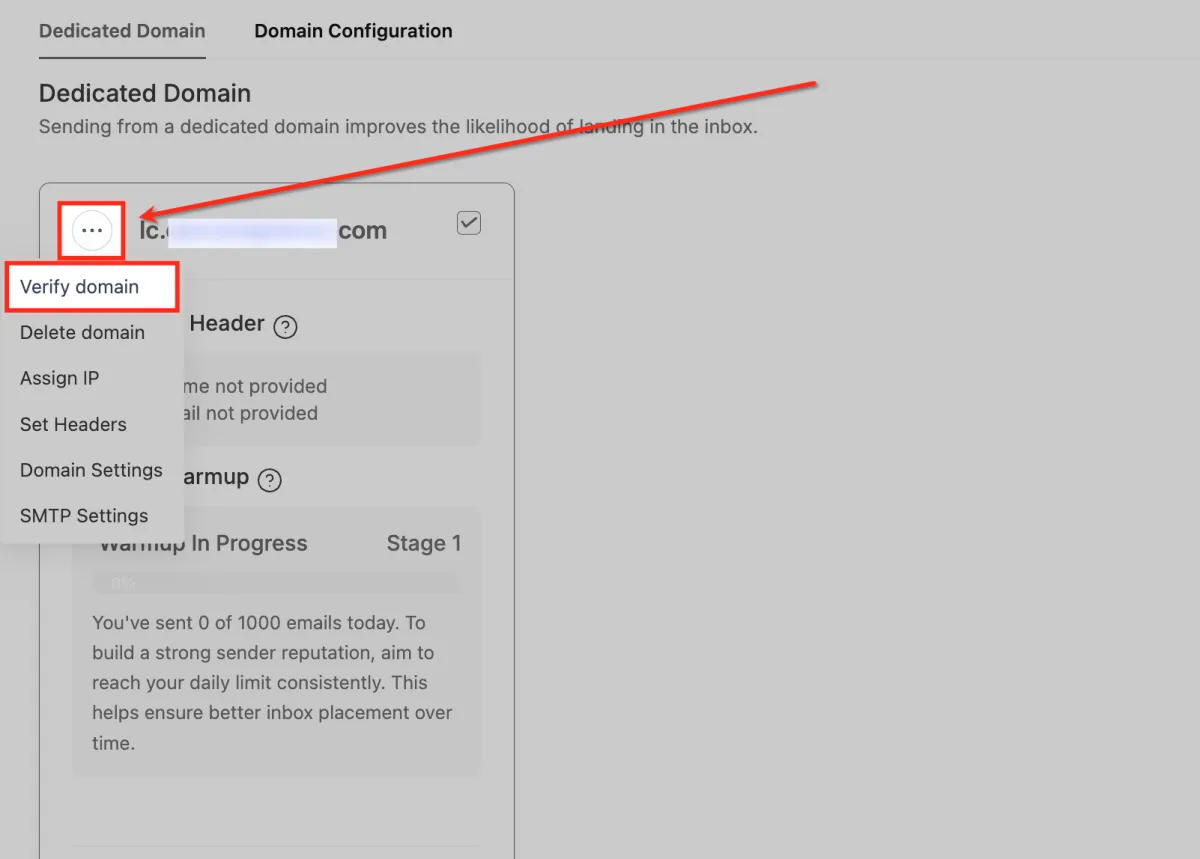
Verifying Your Domain from the Menu
When your domain is added, you can head over to the three-dot menu next to it and click Verify domain. This is a quick way to tell the system, “I’ve set up my DNS records—go ahead and check them now.”
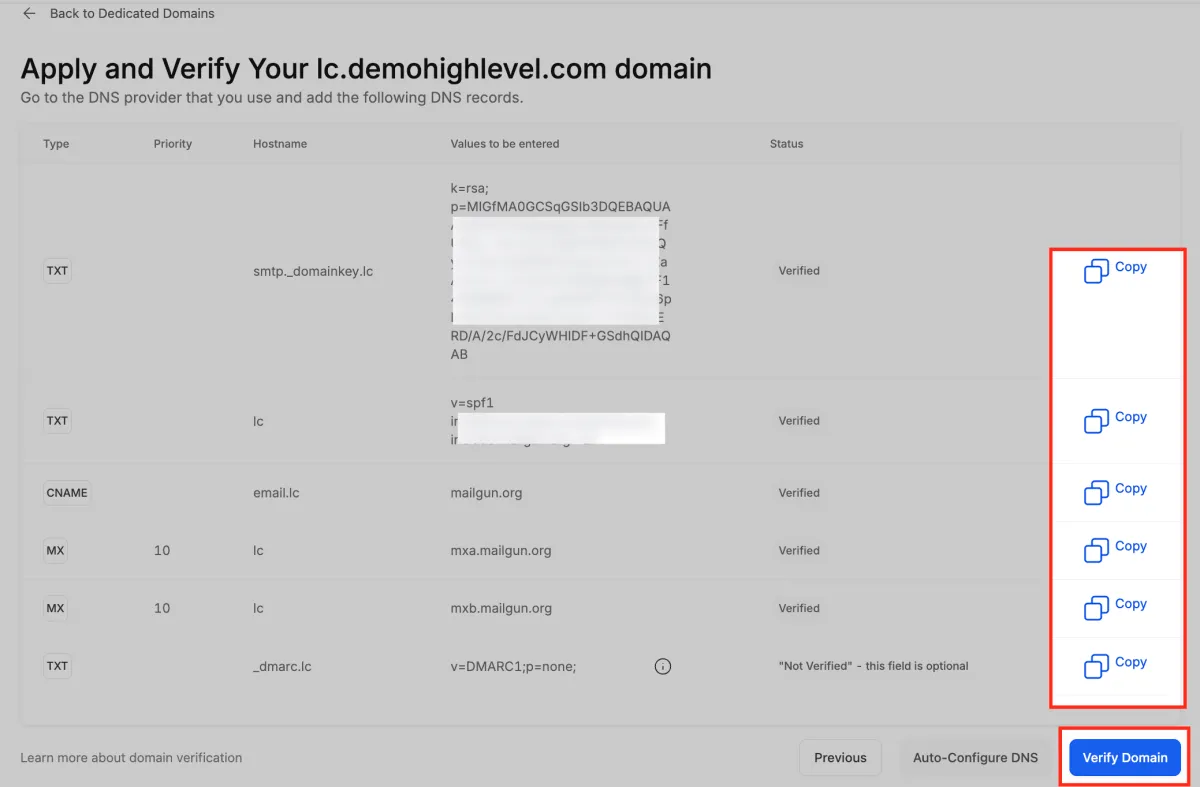
Checking Your DNS Records
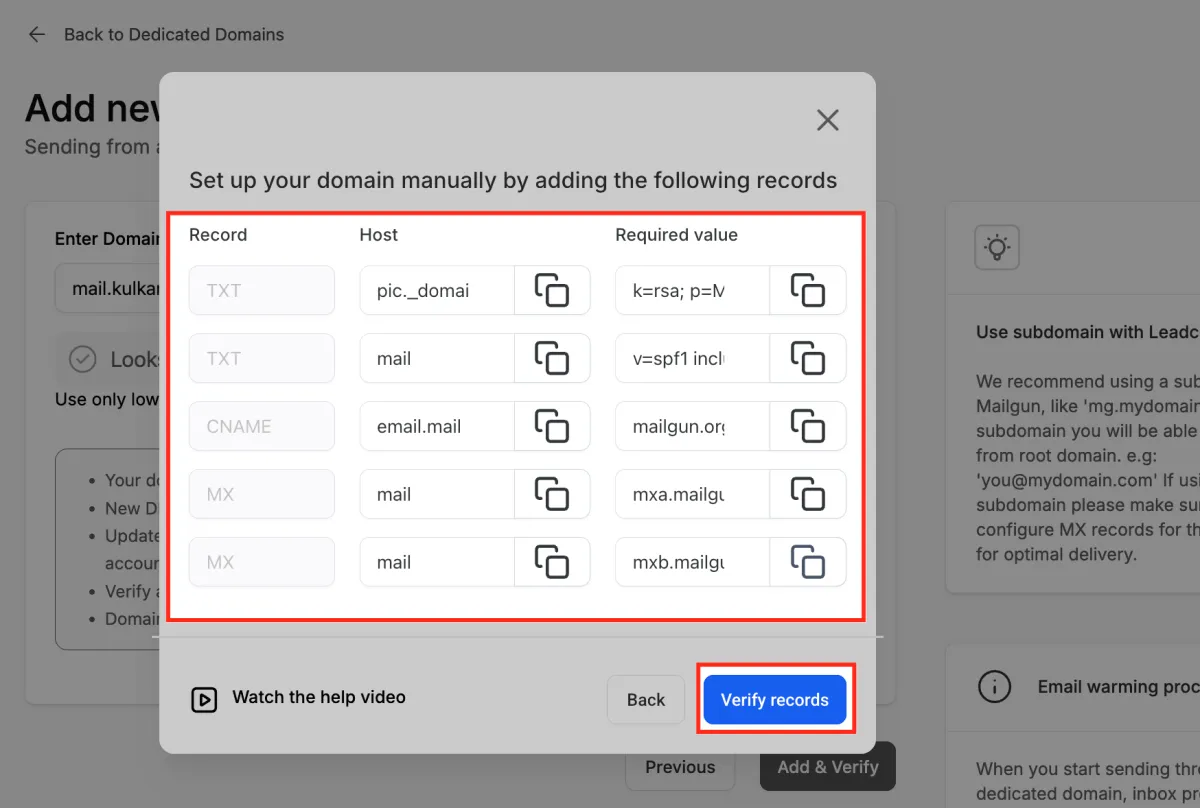
After you hit Verify domain, you’ll see a list of all the DNS records your domain needs (SPF, DKIM, CNAME, MX, and DMARC). Each one shows whether it’s verified, and you can use the handy Copy buttons to paste the values into your DNS provider. Once everything checks out, your domain will be marked as verified.
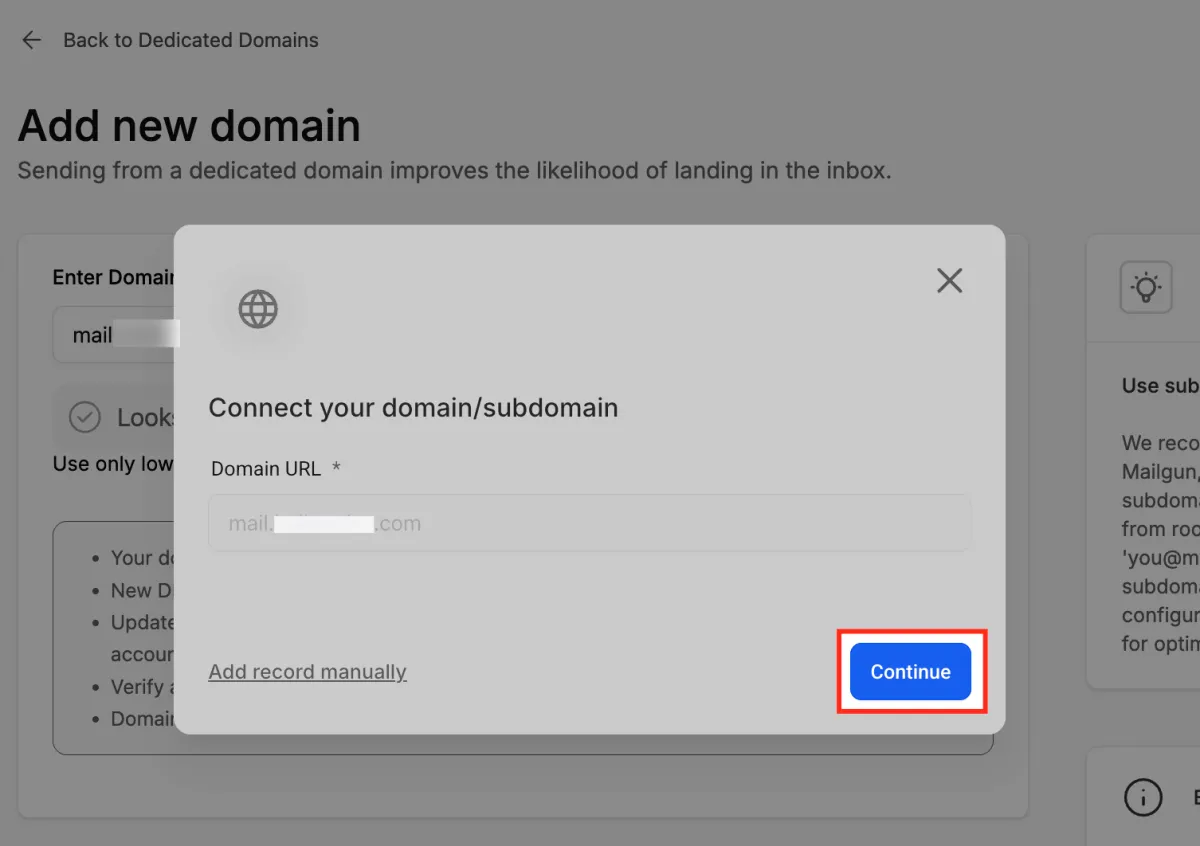
Option 1: Auto‑Configure via DNS Provider Integration
This is the simplest method if your DNS provider is supported.
After adding your domain, click Continue.
MyAura will detect your DNS provider (e.g., Cloudflare, GoDaddy, Namecheap).
Log in and authorize (Lead Connector) to configure your DNS records automatically.
Once completed, your domain will be marked as Verified.
Note: If your DNS provider is unsupported, you’ll be prompted to set up records manually.
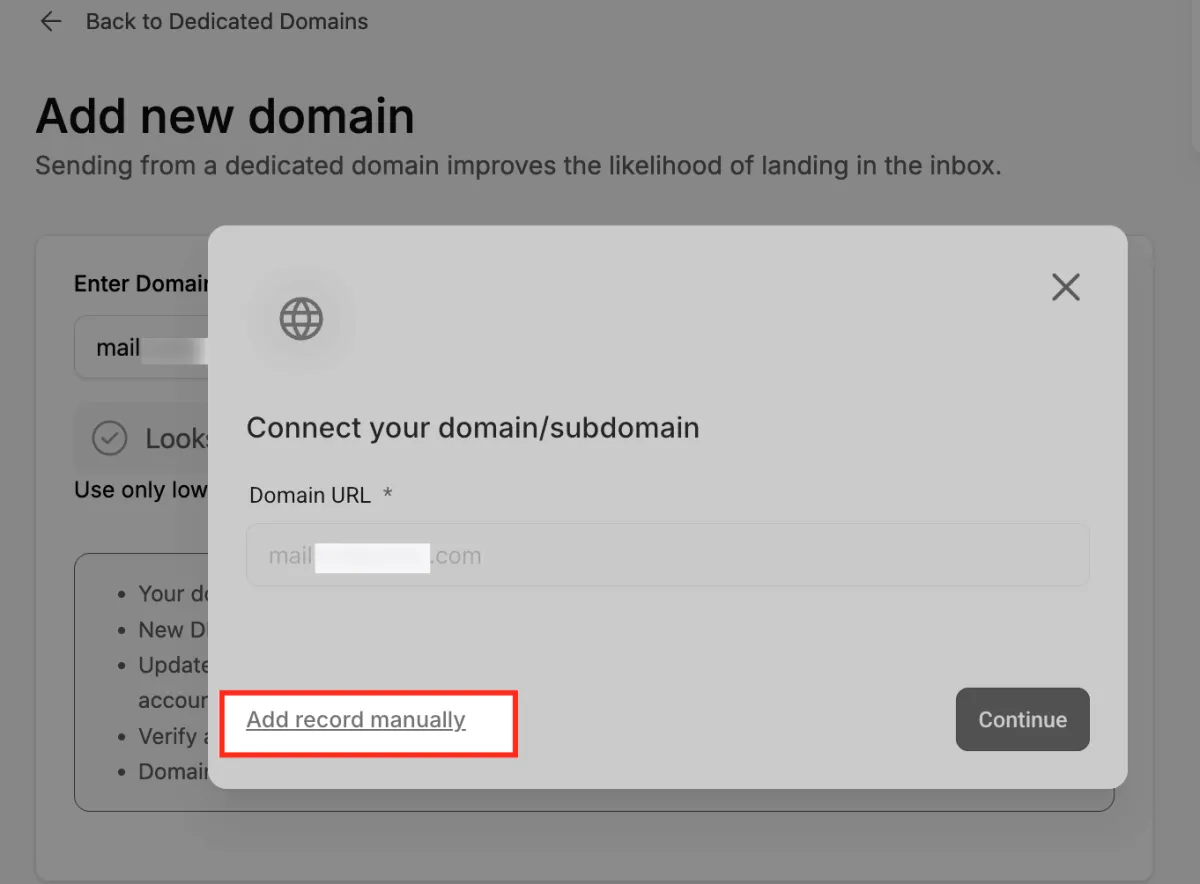
Option 2: Manual DNS Setup
If auto‑configure isn’t available, you’ll need to add DNS records manually. MyAura will provide the exact records you need.
General Setup Guidelines
Type: Add records as TXT, CNAME, or MX as instructed.
Name/Host: For root domains, use “@”. For subdomains (e.g., mail.yourdomain.com), enter just the subdomain (e.g., “mail”).
Value: Copy and paste the values exactly as shown in MyAura
TTL: Set to 5 minutes where possible.
Examples by DNS Provider
Cloudflare
Log into Cloudflare.
Go to your domain’s DNS settings.
Add the records provided by MyAura (TXT, CNAME, MX).
GoDaddy
Log into GoDaddy.
Open Domains > Manage DNS.
Click Add and enter each record.
AWS Route 53
AWS Route 53
Go to Route 53 > Hosted Zones.
Create the necessary record sets.
Namecheap
Log into Namecheap.
Go to Domain List > Manage > Advanced DNS.
Add the DNS records from MyAura.
Google Domains
Log into Google Domains.
Select your domain and go to DNS settings.
Add the DNS records accordingly.
After Verification
Once records are verified:
SSL Certificate Issued: This may take 1–10 minutes after verification.
Domain Status: Your domain will show as Verified/Active in MyAura.
Test Sending: Send test emails to confirm SPF and DKIM pass in headers.
Monitor Deliverability: Use DMARC reports and inbox placement testing tools.
Troubleshooting Common Issues
If verification fails:
Double-check that each record matches exactly as provided.
Ensure you selected the correct record type (TXT, CNAME, MX).
Verify that Host/Name field is correct (avoid extra “@” or leaving out subdomain).
Check if TTL is too high—set it to 300 seconds (5 minutes) if possible.
Be patient: DNS propagation can take longer depending on your provider (sometimes 24–48 hours).
For DMARC: Ensure only one DMARC record exists per domain.
Troubleshooting Common Issues
Q: Should I use a root domain or a subdomain?
We recommend using a subdomain (e.g., mail.yourdomain.com) to protect your root domain’s reputation
Q: How long does domain verification take?
Typically within 1–10 minutes, but in rare cases, propagation can take up to 24–48 hours.
Q: What if my DNS provider isn’t supported for auto‑configuration?
You can always use the manual setup option by entering the provided records directly into your DNS provider.
Q: Do I need a DMARC record for both my root and subdomain?
If you already have DMARC set on your root domain, you don’t need to add it again for the subdomain.
Q: What happens if I misconfigure SPF or DKIM?
Emails may land in spam or fail authentication checks, reducing deliverability.
Getting Started - Setup Your Domain
TABLE OF CONTENTS
Still have questions? Contact [email protected]
What You’ll Need Before You Start
Before setting up your domain, make sure you have the following in place:
Access to your DNS provider’s control panel (Cloudflare, GoDaddy, AWS Route 53, Namecheap, Google Domains, etc.).
The domain or subdomain you want to use for sending emails.
Credentials or permissions to add/edit DNS records.
A basic understanding of DNS record types (SPF, DKIM, DMARC, CNAME, TXT, MX).
Step 1: Add Your Domain
Adding your domain is the first step toward authentication.
Access Dedicated Domains
Navigate to Settings > Email Services > Dedicated Domain & IP.
Add Domain
Once you are inside, "Dedicated Domains" menu, Click + Add Domain option at the top right corner.
Add Domain Details
Enter the domain or subdomain you want to use. (We recommend using a subdomain, such as mail.yourdomain.com, for better deliverability.) Click Add & Verify.
Step 2: Verify Your Domain
Verification ensures your emails are authenticated and trusted by inbox providers. This involves setting up DNS records for your domain.
What DNS Record Types Are Needed & Why
SPF (Sender Policy Framework): Authorizes which servers can send emails on behalf of your domain.
DKIM (DomainKeys Identified Mail): Adds a digital signature to your emails to prove they haven’t been altered.
DMARC (Domain-based Message Authentication, Reporting & Conformance): Enforces authentication policies and provides reporting on email delivery.
Verifying Your Domain from the Menu
When your domain is added, you can head over to the three-dot menu next to it and click Verify domain. This is a quick way to tell the system, “I’ve set up my DNS records—go ahead and check them now.”
Checking Your DNS Records
After you hit Verify domain, you’ll see a list of all the DNS records your domain needs (SPF, DKIM, CNAME, MX, and DMARC). Each one shows whether it’s verified, and you can use the handy Copy buttons to paste the values into your DNS provider. Once everything checks out, your domain will be marked as verified.
Option 1: Auto‑Configure via DNS Provider Integration
This is the simplest method if your DNS provider is supported.
After adding your domain, click Continue.
MyAura will detect your DNS provider (e.g., Cloudflare, GoDaddy, Namecheap).
Log in and authorize (Lead Connector) to configure your DNS records automatically.
Once completed, your domain will be marked as Verified.
Note: If your DNS provider is unsupported, you’ll be prompted to set up records manually.
Option 2: Manual DNS Setup
If auto‑configure isn’t available, you’ll need to add DNS records manually. MyAura will provide the exact records you need.
General Setup Guidelines
Type: Add records as TXT, CNAME, or MX as instructed.
Name/Host: For root domains, use “@”. For subdomains (e.g., mail.yourdomain.com), enter just the subdomain (e.g., “mail”).
Value: Copy and paste the values exactly as shown in MyAura
TTL: Set to 5 minutes where possible.
Examples by DNS Provider
Cloudflare
Log into Cloudflare.
Go to your domain’s DNS settings.
Add the records provided by MyAura (TXT, CNAME, MX).
GoDaddy
Log into GoDaddy.
Open Domains > Manage DNS.
Click Add and enter each record.
AWS Route 53
AWS Route 53
Go to Route 53 > Hosted Zones.
Create the necessary record sets.
Namecheap
Log into Namecheap.
Go to Domain List > Manage > Advanced DNS.
Add the DNS records from MyAura.
Google Domains
Log into Google Domains.
Select your domain and go to DNS settings.
Add the DNS records accordingly.
After Verification
Once records are verified:
SSL Certificate Issued: This may take 1–10 minutes after verification.
Domain Status: Your domain will show as Verified/Active in MyAura.
Test Sending: Send test emails to confirm SPF and DKIM pass in headers.
Monitor Deliverability: Use DMARC reports and inbox placement testing tools.
Troubleshooting Common Issues
If verification fails:
Double-check that each record matches exactly as provided.
Ensure you selected the correct record type (TXT, CNAME, MX).
Verify that Host/Name field is correct (avoid extra “@” or leaving out subdomain).
Check if TTL is too high—set it to 300 seconds (5 minutes) if possible.
Be patient: DNS propagation can take longer depending on your provider (sometimes 24–48 hours).
For DMARC: Ensure only one DMARC record exists per domain.
Frequently Asked Questions
Q: Should I use a root domain or a subdomain?
We recommend using a subdomain (e.g., mail.yourdomain.com) to protect your root domain’s reputation
Q: How long does domain verification take?
Typically within 1–10 minutes, but in rare cases, propagation can take up to 24–48 hours.
Q: What if my DNS provider isn’t supported for auto‑configuration?
You can always use the manual setup option by entering the provided records directly into your DNS provider.
Q: Do I need a DMARC record for both my root and subdomain?
If you already have DMARC set on your root domain, you don’t need to add it again for the subdomain.
Q: What happens if I misconfigure SPF or DKIM?
Emails may land in spam or fail authentication checks, reducing deliverability.
Ready to Transform Your Wellness Business?
Join hundreds of wellness leaders who are nurturing their retreat businesses with our gentle yet powerful platform

The complete platform for wellness entrepreneurs to design, grow, and run their business with purpose.
Platform
Marketing Services
Support
Copyright © 2025. Book Wellness Retreats LLC, All rights reserved
Ready to Transform Your Wellness Business?
Join hundreds of wellness leaders who are nurturing their retreat businesses with our gentle yet powerful platform
The complete platform for wellness entrepreneurs to design, grow, and run their business with purpose.
Platform
Marketing Services
Support
Copyright © 2025. Book Wellness Retreats LLC, All rights reserved